A Practical Guide to the AWS Free Tier

Written by

Cosmy
AI-driven eCommerce Optimization
The AWS Free Tier is a set of offers from Amazon Web Services (AWS) that lets you use cloud services without paying. Think of it as a starter kit for the cloud. It gives you a chance to build real projects and learn how things work, as long as you stay within the usage limits.
How The AWS Free Tier Works
First, understand that the AWS Free Tier isn't one single offer. It's a collection of different deals, each with its own rules and expiration date. Knowing this difference is the key to using the platform without getting a surprise bill.
The goal is to give developers, students, and small businesses a risk-free environment to experiment. Amazon Web Services (AWS) provides enough of its popular tools to build something useful, like a simple website backend or a data processing script. You only start paying when your project grows and needs more resources than the free plan provides.
The Three Types of AWS Free Tier Offers
To use the Free Tier effectively, you need to know the three types of offers available. Each is designed for a different purpose, whether you're just testing a new service or running a small, long-term project.
Let's break them down.
The Three Types of AWS Free Tier Offers
This table gives a quick comparison of the free tier models so you can decide which one fits your needs.
Tier Type | What It Is | Best For | Concrete Example |
|---|---|---|---|
12-Month Free | An introductory offer for new AWS accounts, providing a monthly allowance for core services for one year. | Running a complete, low-traffic application to learn the platform. | 750 hours of an EC2 t2.micro instance per month, enough to run a small server 24/7. |
Always Free | A smaller, permanent monthly allowance for select services that never expires. Available to all AWS customers. | Small-scale functions or applications with consistent, low demand. | 1 million AWS Lambda requests per month for running small pieces of code. |
Short-Term Trials | Time-based or one-time credits for more specialized services. | Evaluating a specific tool, like a database or machine learning platform, before committing. | A 30-day trial for Amazon Redshift with 750 free hours to test a data warehouse. |
In simple terms, the 12-Month Free tier is your welcome package, the Always Free tier is for small, ongoing tasks, and Trials are for testing specific tools.
Here is a visual that helps put it all together.
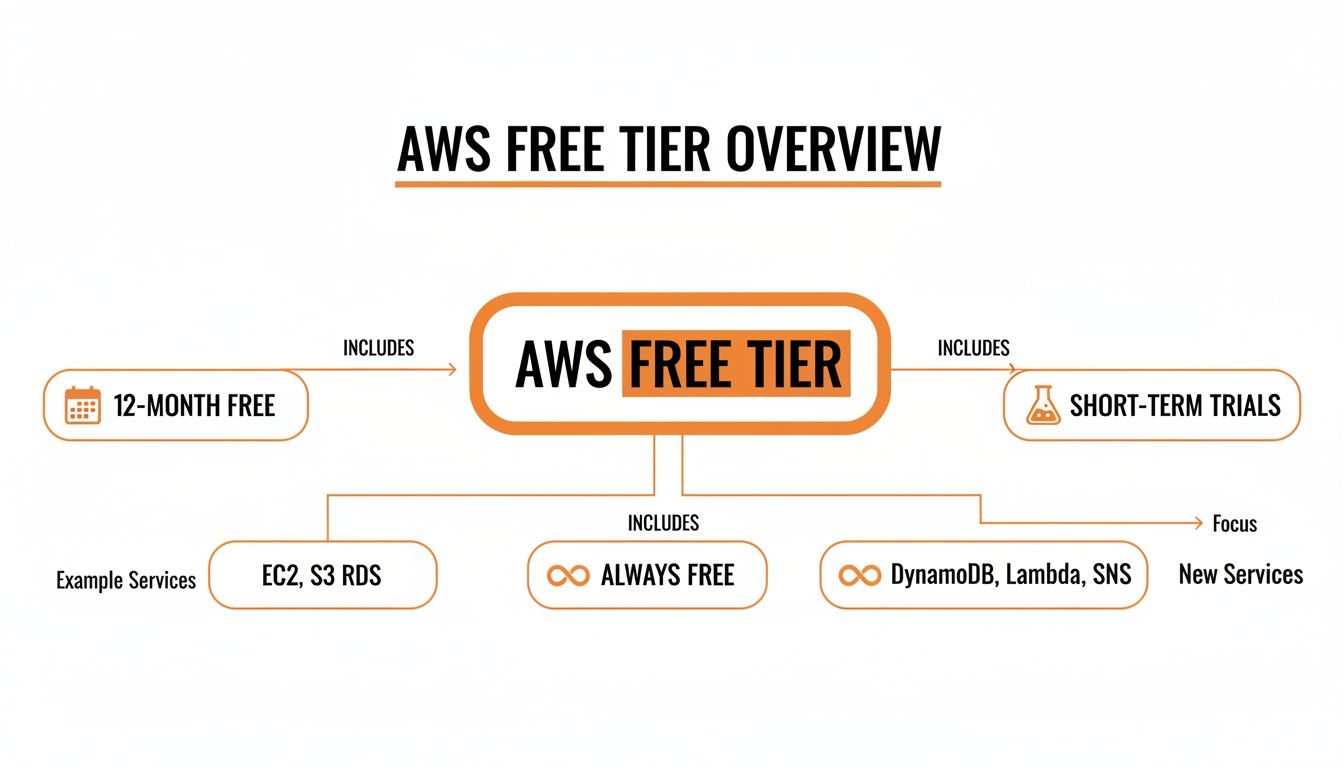
The main point is that the Free Tier is a flexible system. It combines the initial 12-month offer with the long-term use of Always Free services and the focused experiments of Short-Term Trials.
Setting Up Your AWS Account for Success
Getting started with the AWS Free Tier is straightforward, but a few important steps at the beginning can prevent a surprise bill later. The first step is creating your account.
You'll need an email address, an account name, and a credit or debit card. AWS requires a card to verify your identity and to have a payment method on file in case you use more than the free limits allow. This is a standard security practice.

Once your account is set up, it's time to secure it.
Secure Your Account From Day One
When your account is first created, you have access to the root user. This account has complete control over everything in your AWS environment. For this reason, you should never use the root account for everyday tasks.
Your first step should be to create an IAM (Identity and Access Management) user. An IAM user has limited permissions that you define. For example, you can grant an IAM user access to manage web servers but not databases. This approach is called the "principle of least privilege" and is a fundamental part of cloud security.
By creating a separate IAM user for your projects, you significantly reduce the risk that a single mistake, like a script error or a stolen password, could compromise your entire account. Use the root user only for specific account management tasks.
Creating an IAM user is the most important security step you can take. It allows you to work in a controlled environment with limited permissions.
Add a Crucial Layer of Security with MFA
After creating your IAM user, enable Multi-Factor Authentication (MFA). MFA adds a second verification step, requiring more than just a password to log in. It’s like having a second lock on your door that requires a unique, temporary code.
You can set this up with an authenticator app on your phone, such as Google Authenticator or Authy.
Go to the IAM dashboard in the AWS Management Console.
Select the user you want to secure (do this for both your root user and your new IAM user).
Under the 'Security credentials' tab, find 'Multi-factor authentication (MFA)' and click 'Assign MFA device'.
Follow the on-screen instructions to scan a QR code with your app.
Completing these two steps—creating an IAM user and enabling MFA—establishes a secure foundation for your AWS account. You can now explore the AWS Free Tier knowing your account is properly protected.
Now that your account is secure, let's look at the tools. The AWS Free Tier provides a practical set of services you can use to build a real project.
Here are the core services you will likely use, what they do in plain English, and how much you get for free.
Amazon EC2: Your Personal Server in the Cloud
Amazon Elastic Compute Cloud (EC2) is a service that lets you rent a virtual computer in an Amazon data center. This is where you can run your code for a website, an application backend, or data processing scripts, without needing a physical server.
For the first 12 months, the Free Tier gives you:
750 hours per month of a
t2.microort3.microinstance. This is enough to run one small server 24/7 for the entire month.Your choice of a Linux or Windows operating system.
What can you do with this? You could host a WordPress blog, run a development server for testing, or power the backend of a mobile app for a full year at no cost. It is an ideal starting point for most new projects.
Amazon S3: A Massive Digital Storage Closet
Amazon Simple Storage Service (S3) is for storing files. Think of it as a huge, expandable digital filing cabinet. You can use it to store images, videos, backups, static website files, or application data.
Under the 12-Month Free Tier, you get:
5 GB of standard storage.
20,000 Get Requests (to read or download files).
2,000 Put Requests (to save or upload files).
This is enough to store the images for a small online store, handle user-uploaded files, or keep daily backups of your project's database.
A simple way to think about it: EC2 is the engine of your car, and S3 is the trunk. You use the engine to run things, while the trunk holds all your stuff securely.
Amazon RDS: A Managed Database That Does the Hard Work
Most applications need a database to store information like user profiles, product lists, or blog posts. Amazon Relational Database Service (RDS) manages the database for you, handling tasks like software updates, backups, and security. This lets you focus on building your application.
The RDS Free Tier is also part of the 12-month introductory offer:
750 hours per month of a
db.t2.microordb.t3.microinstance.20 GB of General Purpose (SSD) database storage.
20 GB of storage for your automated database backups.
This provides enough power to run a complete relational database for a year. You could support a customer database for an e-commerce store or manage the content for a dynamic website. We have written a guide to help you find out more about the benefits of using AI in eCommerce that you might be interested in.
AWS Lambda: Code That Runs Without Servers
AWS Lambda is a "serverless" service. The servers are still there, but you don't have to manage them. Instead of keeping a server running 24/7 like with EC2, Lambda lets you run small pieces of code in response to events, such as a user uploading an image to S3 or an item being added to a shopping cart.
Lambda has a generous Always Free tier that does not expire.
1 million free requests per month.
400,000 GB-seconds of compute time per month.
This is a large allowance for small tasks. For example, you could use Lambda to automatically resize images when they are uploaded to S3 or to send a welcome email when a new user signs up. Because it's "Always Free," it is a good long-term choice for building event-driven features after your initial 12-month trial ends.
How to Use the AWS Free Tier Without Ever Getting a Surprise Bill

The biggest concern with the AWS Free Tier is the unexpected bill. Fortunately, this is entirely avoidable. AWS provides all the tools you need to monitor your usage and prevent charges.
Your main tool for this is the AWS Billing and Cost Management dashboard. Think of it as your financial control center. Checking this dashboard regularly is the best way to stay in control. It shows what you are using, how much of your free allowance is left, and lets you set up alerts to protect you from costs.
Set Up Your Financial Safety Net with AWS Budgets
The most effective tool for cost control is AWS Budgets. It acts as an early-warning system. You set a spending limit, and if your usage is projected to exceed that limit, AWS will notify you.
As a Free Tier user, the first thing you should do is create a "zero-spend" budget. This will send you an email the moment your account is charged even one cent. This gives you immediate feedback if you have accidentally gone beyond the free limits.
Here’s how to set it up in five minutes:
Go to the AWS Billing and Cost Management console.
Select Budgets from the side menu and click “Create budget.”
Choose the “Use a template (simplified)” option.
Select the “Zero spend budget” template.
Enter your email address to receive alerts and click “Create budget.”
That's it. You have now set up a safety net that lets you use the Free Tier without worrying about surprise costs.
A zero-spend budget is the difference between hoping you stay within the free limits and knowing you will. It’s a simple action that provides complete peace of mind.
Master the AWS Free Tier Usage Page
In addition to setting up alerts, you need to know how to check your usage. The Free Tier page in the Billing Console shows a clear, month-to-date breakdown of your usage for services like EC2 and S3, displaying exactly how much of your monthly allowance remains. For some services, like EC2, the data is updated up to three times a day, giving you a nearly real-time view.
Staying within the limits also means understanding how each service's pricing works. For example, learning about AWS S3 storage prices and how to avoid cost traps will help you make better decisions about how you store data, preventing small mistakes from becoming large bills.
Ultimately, proactive monitoring is about getting the most value from your account. For those running e-commerce businesses, this discipline is crucial. By combining cost control with revenue insights—like those from our Amazon revenue calculator—you can build a more effective and profitable cloud strategy.
Common Mistakes That Lead to Accidental Charges
It's a common story: you think you've followed the Free Tier rules, but an unexpected bill arrives. These charges are almost always the result of a few common and avoidable oversights.
Once you know what to look out for, using the Free Tier becomes much easier. Let's review the most frequent traps and how to avoid them.
Running More Resources Than You Realise
This is the most common mistake. The 12-Month Free Tier gives you 750 hours of a t2.micro or t3.micro EC2 instance per month. This is enough to run a single instance 24/7.
But what happens if you launch a second t2.micro instance for testing? Now you are using your free hours twice as fast. Your 750 hours will be used up in about two weeks. For the rest of the month, both instances will be charged at the standard rate.
The 750-hour limit is a pool of hours for all
t2.micro/t3.microinstances in your account. It is not 750 hours per instance.
Forgetting About Attached Resources
Another common issue is leaving behind "zombie" resources. You might terminate your EC2 server after a project and think you are done. But what about its virtual hard drive? That attached storage, an Elastic Block Store (EBS) volume, does not disappear with the server.
It continues to exist, and you continue to pay for it. It's like selling your car but continuing to rent the parking space. You must manually delete any associated EBS volumes, snapshots, or Elastic IP addresses after you are finished with an instance.
Here’s a quick shutdown checklist:
Terminate EC2 Instances: The server itself.
Delete EBS Volumes: The attached storage drives.
Release Elastic IPs: Any static IP addresses you allocated.
Delete RDS Instances: The managed databases.
Misunderstanding Data Transfer Costs
Data transfer costs can be confusing. The general rule is simple: data transfer into AWS from the internet is almost always free.
Costs typically apply when data goes out to the internet. The "Always Free" tier includes 100 GB per month of data transfer out, combined across all AWS services. If your website or app sends more than 100 GB of content to users in a month, you will be charged for every gigabyte over the limit.
For example, DynamoDB gives you 25 GB of free storage. But if your application constantly sends that data out to users over the internet, you could exceed the account-wide 100 GB data transfer limit. You can explore how to use the AWS Free Tier more effectively to understand these interactions. This is why monitoring your account's total data transfer is just as important as watching your individual service limits.
Building an ECommerce Backend on the Free Tier
The best way to understand the AWS Free Tier is to build something with it. Let’s create a simple, automated backend for an e-commerce store.
The goal is to automatically track product performance by processing daily sales reports. We will build the entire system using only free services, so it won't cost anything to run. This project solves a real business problem: identifying which products are selling well and which are not, without manual effort.
The Blueprint for Your Project
Our system will have four main parts, each using a service from the AWS Free Tier. Think of it as a small team where each member has a specific job.
The setup is designed to be efficient and stay within the free usage limits, providing a risk-free way to gain practical experience.
Assembling the Core Components
First, we need a place to store our raw data. Amazon S3 (Simple Storage Service) is perfect for this. We’ll create an S3 bucket—a secure folder in the cloud—to hold our daily sales reports as simple CSV files. The Free Tier gives us 5 GB of storage, which is more than enough for years of daily reports.
Next, we need an "engine" to process the data. We will use an Amazon EC2 instance. The t2.micro server, with its 750 free hours per month, will act as our workhorse. It will run a small script that fetches the latest sales report from S3, calculates key metrics like units sold, and prepares the clean data for storage.
To store the processed information, we'll use Amazon DynamoDB, a fast and flexible NoSQL database included in the "Always Free" tier. You get 25 GB of storage and enough read/write capacity to handle millions of requests a month for free. This is where we will keep our organized product performance data, ready for analysis. Deciding what to store is important, and understanding the right key performance indicators for eCommerce will help you focus on the metrics that matter.
The real value is how these services work together. S3 is the inbox for raw files, EC2 is the processor that does the work, and DynamoDB is the organized library for our final business insights.
Finally, we need to automate this workflow. That's a job for AWS Lambda. We can set up a Lambda function to run on a schedule, such as once every night. This function's only job will be to start our EC2 script to process any new sales files in S3. With 1 million free requests per month under the "Always Free" tier, this automation costs nothing.
By connecting these four services, you create a powerful, fully automated data pipeline that turns raw files into useful information, all without spending any money.
Frequently Asked Questions About the AWS Free Tier
Let's answer some of the most common questions about the AWS Free Tier to help you avoid confusion.
What Happens When My 12-Month Free Tier Expires
When your 12-month introductory period ends, any services you were using under that offer will automatically switch to standard pay-as-you-go pricing. The free monthly allowances for services like EC2 and S3 will no longer apply.
The good news is that you will still have access to all the services in the "Always Free" category, such as AWS Lambda and DynamoDB. The key is to be proactive. Before your 12 months are up, review everything you have running and shut down anything you don't need.
Is the AWS Free Tier Really Free
Yes, it is genuinely free, but you must stay within the specified usage limits for each service. If you do, you won't be charged. There are no hidden fees.
A bill is generated only when you exceed the free usage limits, use a service that is not part of the Free Tier, or when your 12-month trial period ends. This is why setting up billing alerts is so important.
By actively monitoring your account and setting a zero-spend budget, you can ensure your experience remains completely free. It puts you in control and eliminates any guesswork.
Can I Use the AWS Free Tier for a Commercial Project
Yes. AWS has no restrictions on using the Free Tier for commercial projects. It is a powerful way for startups and small businesses to build and launch their products without initial costs. Many companies have built their first applications and websites on the Free Tier.
Once you are comfortable with the Free Tier, the next step is to learn about long-term cost management. For more advanced strategies, resources like the Top 10 AWS Cost Optimization Recommendations for 2026 can be very helpful.
Instead of guessing how Amazon’s AI evaluates your products, get data-driven answers. Cosmy provides a free content audit that shows you exactly how to improve your product listings to win in AI-powered search. Start your free audit and see your visibility gaps in minutes at https://cosmy.ai.